My reasons for writing this tutorial are two fold:
1. I only had a video to watch when I started, plus some measurements from a friend who had already made many masks. I do not work well from videos. I want measurements. It took me almost a day to make my first mask with a pocket and nose piece. The rest have gone a lot faster because I kept learning as I sewed. Still, they do take time.
2. I saw some masks at the Farmers Market that did not stay on the nose and/or had other problems that did not make them a very good defense against the Coronavirus.
SUPPLIES for 1 mask.
FABRIC
for 1 mask: washed, dried in a dryer, ironed before using.
Outside 100% cotton fabric: Cut 1 piece 9” x 7.5”
Lining 100% cotton sheeting/pillowcase: Cut 1 piece 6.5”
x 7.5”
Nose
Piece: 4.5” up to 5” finished will work fine.
Using
18 or 20 gauge copper wire: 2 ways to finish ends so
they do not poke the fabric. You can use any wire of your choice as long as it will not rust.
Option
#1: BEND each end in a small loop. The length will depend on your
bending. Experiment to see what works for you.
Option
#2: Cut the wire. POUND the ends flat on a metal surface. I
used the side of a sledge hammer for my surface.
Using
the 18 gauge, flat covered copper thermostat wire, CUT ~ 4.5”
Two strand thermostat wire on the left is copper inside. The large roll makes it lay flat better than the small spool of 18 gauge copper picture hanging wire on the right. The solid copper wire needs to have the ends either pounded flat or turned to prevent poking the mask. The thermostat wire is coated flat wire that does not need anything done to it after cutting. I tested ironing it between 2 pieces of fabric. It showed no melting after ironing the fabric flat. I'm sure it could be made to melt. But I also think the fabric might burn. I'm not going to test this theory because I do not want to clean my iron. Check what you have around your house. You might have something that will not rust that you could use. NOT rusting is a requirement.
Fasteners:
If you are making masks for a particular place, check with them to
see exactly what they would like. Elastic is usually required by
hospitals and nursing homes because it is easy to use. Because of
this Pandemic, elastic is in short supply. Some places have elastic,
so they will insert the elastic into the masks when they are
delivered.
Elastic
type preferred: round, 1/8” flat, 1/4” flat, or make what you find work. Larger elastic can be used to go
around the head. Some people are using large size pony tail holders. Problem = not
adjustable.
Elastic
length preferred: CUT 9” so that it can
be adjusted to fit.
No
Elastic: Use string, ribbon, anything that will tie.
Loop design, CUT ~ 55" to 60”.
Loop design, CUT ~ 55" to 60”.
 Construction Method: Align the 7.5" edges of the outer fabric and lining, right sides together.
SEW a seam on each end ~ 1" to 1.25" in from the end.
[I have used 2 different fabrics for the outsides of my masks. I hope you are not confused by this. All of the linings are the same sheeting fabric from two sets of sheets. I took photos continually, when I remembered. Sometimes I missed a step. When I have put the elastic in a pile of sewn masks laying on my table, as well as complete the prototype I'm working on today, I will have made my first 100.]
PRESS seam open. SEW a zig-zag or other type of finishing stitch along the edge of the lining fabric. This will be the edge of the pocket to hold a filter if a person chooses.
Align the bottom edges. Sew a seam the total length. Press the seam toward the outer fabric.

Turn right sides out. Press the pocket edge to allow room for the nose wire.
Press down over the bottom edge. Now you are ready to make the nose wire pocket.
How to make a pocket for the nose wire.

Move needle as far to the right as it will go, start sewing the nose wire pocket.
Sew in ~ 1" or more. Stop.
Move needle as far to the right as it will go, start sewing the nose wire pocket.
Make a stop seam for the nose wire.
Turn toward the folded edge. Sew to that edge, back up to the sewn line, turn around to continue sewing until ~1" or more from the other edge.
Insert the nose wire until it hits the stop seam you just sewed. Feel for the nose wire. Make sure your needle is past the nose wire. When you are absolutely sure the needle is past the nose wire, turn toward the folded edge.
Sew up to the folded edge, then back down to the seam. You have just completed a pocket to hold the nose wire in place.
Continue sewing the seam almost to the edge of the fabric.
Turn the fabric until you are heading toward the bottom. Sew completely around the perimeter, catching the fabric pressed toward the bottom. This will hold everything neatly in place.
Your personal mask should not be used by anyone but you. It must be washed after every wearing.
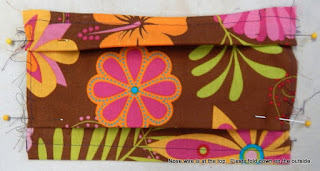
How to pleat the mask with or without a template.
Lay the outer fabric down on an ironing board.
Fold down the top ~ 1"; press.
 Turn over with the outside up on the ironing board.
 Fold top fold down ~ 3/4". Pin.
Fold bottom fold down so that is is ~1" from bottom. Pin in place.
 The last step in pleating is to adjust the center pleat so that the total on each edge is ~3". I used a metal ruler until I made this jig.
[I forgot to take a photo in process, but this is how it should look when pleating is finished.]
Now add cut 2" or cut up to 2 1/2" bindings on each side; leave the ends open for elastic or ribbon.
Or you can add long, smaller bindings to use as ties. These will need to be ~ 36" to 40" total length each side, with the 'pleated mask' inserted in the center.


No comments:
Post a Comment