Friday, December 10, 2021

A Brief History of How I Developed My LOVE of Pajamas.

Until I received a pair of flannel pajamas as a Christmas present, I had generally worn nightgowns except for the occasional pair of 'shorties' for summer.  The gifted PJ's were warm and fun because of the comical penguin flannel fabric.  Even though the arms and legs were a bit short, I loved the warmth.  They got washed and dried quickly so that I could wear them all through the cold winter months here in Maine.  I bought some 'bottoms' and another pair, but they did not fit very well either.  Therefore, I decided to make my own. 

After buying a basic PJ pattern, I adjusted the pattern [longer legs + more butt room], I made my first pair.  My idea was to make just the bottoms because the tops were too complicated.  Plus, I like wearing cotton knits that will stretch with movement.   These bottoms were made just like the pattern:  set in side pockets, fold-over top for the elastic, straight legs with nothing extra.  No embellishment at all.  They fit well except that the legs would ride up during the night, leaving my legs without a warm covering.  I was determined to fix that.  This pair is long gone; totally worn out. 

For my next pair, I lengthened the legs even more, yet kept them off the floor by adding cuffs that were just big enough to slide over my foot, but too small to fall past my ankle when standing.  I also decided to try and make some round pockets.  Why?  Just to see if I could make them.  I had seen some in a photo, so I had to try.  They were hard, but I did get them done.  However, they are not very practical because they do not hold much at all.  Not really worth the time involved.  I still wear these, but not for a pajama day because the pockets are too small.    More info here
https://designerann.blogspot.com/2014/12/fun-wear.html

It was another year before I made more PJ bottoms.  This time, I decided to tackle the problem of excess layers of flannel in the crotch.  Not very comfortable when sitting.


I am not sure where I got the idea for a 'crotch gusset', but it could have been from this pair of silk underwear.  As you see, the seams are all around the crotch instead of under it.  When I made the gusset for my PJ's, I also added another layer of flannel facing on the inside; nice and comfy.   To see the original post showing the gusset, go to the link below.


On the left is the first pair with the now requisite 'crotch gusset'.  As soon as these were finished, I made another pair.  These bottoms represent the first time where I decided everything did not have to be flannel.  I am now on a roll to get more pajamas so that I am able to have more pajama days, then have another clean pair for bed.  I finished the next 2 pair, then retired until December 2019.  Original post here
https://designerann.blogspot.com/2015/12/necessary-2-new-pair-of-pj-bottoms.html


While many many many are dying of COVID, I am remaining as safe as possible.  However, my creativity has suffered.  Today I got inspired by the Gee's Bend quilts.  I've seen some before.  Yet, today the stories penetrated my heart.  Hope they will do the same for you.

https://www.soulsgrowndeep.org/gees-bend-quiltmakers

You also might want to view the video here

https://www.karmatube.org/videos.php?id=851

Sunday, December 27, 2020

I am DONE making masks

I have been trying to create a better fit of the 'Olson type mask'.  This is the result.

Obviously, this one has problems.  So, I tried some more.  Finally came up with this one.

Happy with the way this fits me, I made a few more to give away.  Luckily, I did not make a lot.  Unfortunately, what fit me very well, did not fit a different shape face at all.  About the same time I found this misfit out, I discovered the follow for sale.


When I first started making masks last March, there was nothing out in the market place PLUS there was a shortage in the medical facilities.  Now, there are many for sale, some really goods ones, some awful.  It appears that the medical facilities are doing OK.  Therefore, I do not think I need to make any more.  So , I am DONE making masks.

Wednesday, December 2, 2020

Exploring more mask designs

These are some mask designs I've been wanting to make for a long time.  However, when I was in a production mode because so many masks were needed, I did not take the time.  Now, Masks and mask patterns are very available around here.  However, because masks are more important than ever, I'm taking some time to try a few new styles.  

Still using the recommended fabrics:  quilting fabric on the outside; pillowcase/densely woven sheeting on the inside.  I am no longer making pockets for filters because of the 125+ I have given away, no one has used it.  I know I do not use it because it is all I can do to breathe through these 2 layers.

This Korean style mask is one I have tried before, but it was way too small.  Now this one is waaaaaay too big.  This is one of the easiest masks to make.  However, I did not put in a nose wire.  I added darts at the nose and chin.  Still not happy with the fit.  Obviously, this one is too big for me.  Do not like the pressure it puts on the end of my nose.  Without the dart it was be worse.  IF I see someone wearing one, I'll try to take a good look at how it fits.


Another style I tried was a simple rectangle with box pleats at the nose and under the chin.  This one is way too big for me.  Easiest mask to cut, medium effort over all.  Once again, this is too big.  Like the coverage plus the space inside.  


I started with this marked up pattern [black lines] sent by a friend in my sewing group.  All of the colored lines are different variations that I tried.  I took the photo on this fabric so you could easily see the problems I had working with this print which was printed wonky.  Of course I did not notice that when I bought it.  I just thought it would be a good winter pattern that could go beyond the holiday season.  Below is the version I made from the yellow lines on the drawing.  By this time, I have run out of colors.  This looks large, but feels very good on.   


At the very start of my mask making, the Olson style mask was one I liked immediately because of the way it seemed to fit people modeling it on line.  However, I could not figure out how to cover up the hole in the middle without a LOT of fiddling.  This mask takes the longest amount of time to cut + the lining is a pain because of the shape.  Those holes down the center of both the lining and the mask are really hard and time consuming to cover up.  I have tried pressing that seam apart and fusing a piece of the lining fabric over the seam and edges of the fabric.  I have tried pressing the seams to one side, then fusing a piece of lining fabric over the seam and fabric edges.  One thing I have not tried is just pressing the seam open and fusing a piece of lining over that area and not extending to the back of the mask or lining fabric.  I will try that next.  It is the most time consuming to cut out + + + lots of time to seal up that hole + adding the wire is tricky because of the seam in the middle = absolute hardest mask design I have made.  Still, because it has the BEST FIT, I'll try making a few more.

I welcome ALL ideas on how anyone has solved the problem of the hole down the center.  

Monday, April 13, 2020

How to Make a Protective Virus Mask with a Pocket

My reasons for writing this tutorial are two fold: 
1.  I only had a video to watch when I started, plus some measurements from a friend who had already made many masks. I do not work well from videos.  I want measurements. It took me almost a day to make my first mask with a pocket and nose piece.  The rest have gone a lot faster because I kept learning as I sewed.  Still, they do take time.
2.  I saw some masks at the Farmers Market that did not stay on the nose and/or had other problems that did not make them a very good defense against the Coronavirus.  

SUPPLIES for 1 mask.

FABRIC for 1 mask: washed, dried in a dryer, ironed before using. 
Outside 100% cotton fabric: Cut 1 piece 9” x 7.5”
Lining  100% cotton sheeting/pillowcase: Cut 1 piece 6.5” x 7.5”

Nose Piece: 4.5” up to 5” finished will work fine.
Using 18 or 20 gauge copper wire: 2 ways to finish ends so they do not poke the fabric.  You can use any wire of your choice as long as it will not rust.  
Option #1: BEND each end in a small loop. The length will depend on your bending. Experiment to see what works for you.
Option #2: Cut the wire. POUND the ends flat on a metal surface.  I used the side of a sledge hammer for my surface.

Using the 18 gauge, flat covered copper thermostat wire, CUT ~ 4.5”

Two strand thermostat wire on the left is copper inside.  The large roll makes it lay flat better than the small spool of 18 gauge copper picture hanging wire on the right.  The solid copper wire needs to have the ends either pounded flat or turned to prevent poking  the mask.  The thermostat wire is coated flat wire that does not need anything done to it after cutting.  I tested ironing it between 2 pieces of fabric.  It showed no melting after ironing the fabric flat.  I'm sure it could be made to melt.  But I also think the fabric might burn.  I'm not going to test this theory because I do not want to clean my iron.  Check what you have around your house.  You might have something that will not rust that you could use.  NOT rusting is a requirement.

Fasteners: If you are making masks for a particular place, check with them to see exactly what they would like. Elastic is usually required by hospitals and nursing homes because it is easy to use. Because of this Pandemic, elastic is in short supply. Some places have elastic, so they will insert the elastic into the masks when they are delivered.

Elastic type preferred: round, 1/8” flat, 1/4” flat, or make what you find work.  Larger elastic can be used to go around the head.  Some people are using large size pony tail holders. Problem = not adjustable.

Elastic length preferred: CUT 9” so that it can be adjusted to fit.

No Elastic: Use string, ribbon, anything that will tie. 
Loop design, CUT ~ 55" to 60”.

Construction Method:  Align the 7.5" edges of the outer fabric and lining, right sides together.
SEW a seam on each end ~ 1" to 1.25" in from the end.

[I have used 2 different fabrics for the outsides of my masks. I hope you are not confused by this. All of the linings are the same sheeting fabric from two sets of sheets.   I took photos continually, when I remembered.    Sometimes I missed a step.  When I have put the elastic in a pile of sewn masks laying on my table, as well as complete the prototype I'm working on today, I will have made my first 100.] 

PRESS seam open.  SEW a zig-zag or other type of finishing stitch along the edge of the lining fabric.  This will be the edge of the pocket to hold a filter if a person chooses.

Align the bottom edges.  Sew a seam the total length.  Press the seam toward the outer fabric. 


Turn right sides out.  Press the pocket edge to allow room for the nose wire.  
Press down over the bottom edge.  Now you are ready to make the nose wire pocket.


How to make a pocket for the nose wire.


Move needle as far to the right as it will go, start sewing the nose wire pocket.  
Sew in ~ 1" or more.  Stop.
Make a stop seam for the nose wire. 
Turn toward the folded edge.  Sew to that edge, back up to the sewn line, turn around to continue sewing until  ~1"  or more from the other edge.


Insert the nose wire until it hits the stop seam you just sewed.  Feel for the nose wire.  Make sure your needle is past the nose wire.  When you are absolutely sure the needle is past the nose wire, turn toward the folded edge.  
Sew up to the folded edge, then back down to the seam.  You have just completed a pocket to hold the nose wire in place.

Continue sewing the seam almost to the edge of the fabric.

Turn the fabric until you are heading toward the bottom.  Sew completely around the perimeter, catching the fabric pressed toward the bottom.  This will hold everything neatly in place. 

Your personal mask should not be used by anyone but you.  It must be washed after every wearing.  


How to pleat the mask with or without a template.


Lay the outer fabric down on an ironing board.
Fold down the top ~ 1"; press.


Bottom edge pressed up to almost meet the top edge.


Turn over with the outside up on the ironing board.  
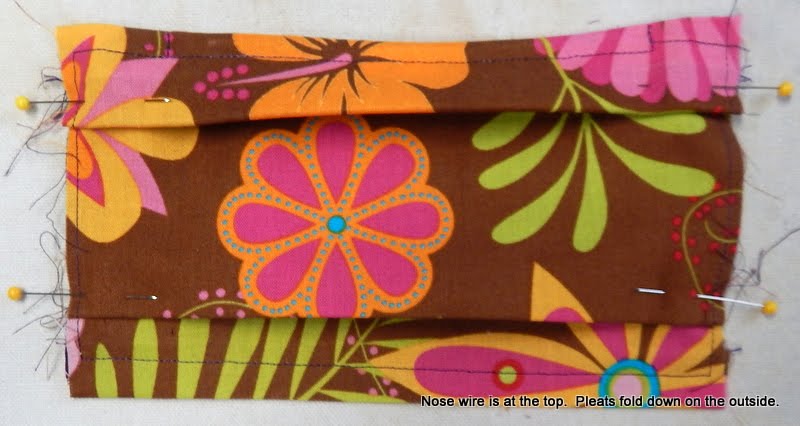
Fold top fold down ~ 3/4".  Pin.

Fold bottom fold down so that is is  ~1" from bottom.  Pin in place.


The last step in pleating is to adjust the center pleat so that the total on each edge is ~3".  I used a metal ruler until I made this jig.

[I forgot to take a photo in process, but this is how it should look when pleating is finished.]

Now add cut 2" or cut up to 2 1/2" bindings on each side; leave the ends open for elastic or ribbon.  

Or you can add long, smaller bindings to use as ties.  These will need to be ~ 36" to 40" total length each side, with the 'pleated mask' inserted in the center.


Friday, April 3, 2020

PLEASE use lots of SOAP + Cover your nose and mouth

My view is that everyone should cover their nose and mouth when going into any contained space, ie grocery, pharmacy, feed store (animals need to eat too), etc where the people on the cash registers MUST WORK or risk loosing their employment.

Many of us that sew are making cotton, washable masks for hospitals, nursing homes, convenience stores, small markets and others in need of masks.  However, many people go without wearing anything.  Something is always better than nothing.

If you have a bandanna or a pillow case that can be cut into a piece big enough to act as a bandanna, please do so.


The Bandito 

The difference between the Bandito and a bandanna is only a simple dart in the nose area as well as making a knot in the free ends to get it closer to the body.  This makes it cling to the face better that just using a bandanna.  The tuck can be made my hand sewing, stapling, or other means of your invention.  Maybe duct tape might work? If you can not alter the bandanna, just use as the bandits did, tie it in back without a dart. 

The main idea is to get it as close to your face as possible + stop the flow of air and especially droplet leaving your mouth and nose.  The knotted part hanging could be stuffed in a shirt or coat to decrease the air flow even more.  Using a pillow case will increase the density of the material which will trap more particles.  NO, this will not stop the virus.  It will help.  It will also help you from touching your face which is very important.

The BEST thing you can do is stay in your home.  Only go out for absolutely necessary items such as medicine and food for you, family members, pets and others who can't get out.

Your eyes are also vulnerable to infection from this virus.  Wear glasses or sunglasses to protect your eyes.

https://www.ecowatch.com/coronavirus-face-masks-2645078070.html

"All masks and goggles are of little use if the most important hygienic principles are neglected. For example, if you come home after a long bus or train ride, where you touched handrails and handles, take off the mask and scratch your nose, You could have left out the protective mask just as well."

When you come home from being in a confined space, slip off your shoes and leave them at the entrance.  Take off your mask. 
Alternative #1.  Drop the mask on the hard floor or a container.  Leave it alone for 4 or more days.  The virus will die within the 4 days.  WASH your hands.  Wash the sink handles, the door handle and anything else you touched.

Alternative #2. In your stocking feet, walk to the bathroom sink without touching any handles, take your mask off, drop it in the sink.  WASH your hands.  Now wash is mask with LOTS of soap and water.  Hang it to dry, or put it in the dryer, or iron it dry. Wash the sink handles, the door handle and anything else you touched.

Proper Hand Hygiene:
SOAP up, make lots of lather, WASH vigorously for 30-60 seconds.

Please remember that I am not a scientist.  My information is gathered from the best sources I could find.  One other important thing is NOT to touch your face, especially your eyes.  

Sunday, August 4, 2019

Birthday Quilt for Evelyn Noelle

I hope my cousin Stewart's family enjoy playing this game as much as I do.  I find it even more fun than the 'I Spy' quilts I made for the previous children in these families.

My machine is no longer sewing letters with any kind of accuracy, so I've used permanent fabric markers instead.  This has an air filling, flannel backing.  It is lightly quilted with a meandering line which has hearts sewn in as I saw fit.  All of the seams were totally sewn down before the backing and front were joined.  That is a lot of really boring work, but it will keep the squares flat when washed and dried. This quilt was folded for travel when I realized I had not yet taken a photo.  Now it is once again rolled tight, ready to travel to the Indianapolis area in 10 days to be delivered to the new First Cousin Twice Removed.  This means it is my dear First Cousin Tom's son's daughter.

Birthday Quilt for Evelyn Noelle
40" x 60"

This is my second "Matching Game" quilt. Last March, the first quilt was delivered to the family of this cousin's brother who lives in Pebble Beach.

Thursday, March 14, 2019

A Quilt for a Child

This is the third quilt for a baby/child in the family that I have made.  I made an 'I Spy' quilt for each of my 2 cousins first children. This quilt is for the second child in one family.  I went out for the wedding on 1-1-2011.  The second child was born in late January this year.  Next week I am traveling from the east coast where I live, to the west coast where they live, to hand deliver this new quilt.  It should be fun to see them again as well as their 2 year old and the new baby.

The Matching Game

Although I do not expect this will be used as a game for a couple of years, it is still colorful enough to catch anyone's eye.  Lots of interesting things for a baby to look at.  I imagine Kai, the toddler, will be more interested than the baby Viola in the beginning.  I made both of their quilts rather large so they could also be used as beach blankets since they are a quick car ride from the beach at Carmel-by-the-Sea.  I also did not use any filling since it is so warm there and also the weight of cotton batting on a quilt 40" x 56" would be way too heavy for a child to lug around.  I backed it with flannel in a music print because both parents hold Doctorates in Musicology.  

I know this is not like anything anyone has every seen.  It is not a pretty pattern that we use for our adult quilts.  My view is that we like those patterned quilts, but I think a child will find this quilt more interesting.  Therefore, I dubbed it, "A Quilt for a Child."

It is an odd number of squares making a perfectly rectangular quilt.  One square, the large one with the children playing different musical instruments matches 3 small squares, one of each child.  Another square with a woman and a girl have 2 small squares containing each of the images shown on the large square as their matches.  That was the way I made the matches of an odd number work.  I needed the odd number because of the size as well as the fact that it would be too too hard to match if it were all small squares.  It is also difficult to find enough plain colors that can be seen as really different.  The solid colors help make it a little easier to find the "matches". 

Each block seam is pressed to one side then stitched down.  I do not want a lot of lumps when it is tossed into the washer and dryer.  When everything was neatly stitched down, I pinned the back on, then stitched with a meandering line, pausing now and then to add a heart.  I used a patterned fabric for the binding because I did not want it to show the dirt a child always adds.  

Monday, March 11, 2019

the Energy Coalition


The Energy Coalition speaks for itself.

This is for the 6th Thomas Edison National Historical Park Art Exhibit.  The theme is "Building on the Past to Meet the Future".  

Once I found out that the Solar Wind has enough energy to provide for all our planet's needs, I conceptualized how we might put it to good use.  This energy would only be available for Peaceful Nations.  Unfortunately, it does not look like our nation would qualify at this time.  I was born at the end of WWII.  It seems as if we have been involved in some war ever since.  Will we ever have PEACE?

The fabric medium is totally new to me.  It is called evolon, a trademarked name for a non-woven microfiber canvas.  I had wanted to use water colors, but of course that is one medium that does not work on this fabric.  Instead, I used fabric markers.  At 2' square, I burnt out my yellows.  If you are a print maker, you might want to try this.  I only had the one piece for this project, so no time to experiment.

Friday, December 28, 2018

Let us have EARTH RISE this year.


This new year, 
I want to join the astronauts in their VISION of 
Earth Rise.


The vision of Earth Rise
Our PLANET as ONE collaborative visionary interaction of independent people working toward PEACE with PROSPERITY for all people as well as our planet.

The principles of Earth Rise
1. Interdependence
2. Long Term Thinking
3. Profound Collaborations with both Empathy and Compassion


Sunday, June 24, 2018

Prayer Quilt for Sukie

This was project was begun when our Dear Friend Sukie was diagnosed with Ovarian Cancer.  Lots of prayers are in this quilt.

Early in the process I gave Sukie a rectangular quilt to try.  She became frustrated and confused because she did not know which way it was suppose to go.  Thus the idea of making a square quilt was born.  Every side is the up side.  Any way it goes is the right way.   I have never even seen a quilt made this way before.  I do think it works.

Presenting the finished Prayer Quilt to Sukie.

Sukie is a little stunned even though she knew this was happening.  Because some blocks came after the quilt was begun, I made a small book of prayers to accommodate those blocks.

Sukie's Finished Prayer Quilt ~ 60" square

It is actually square.  However, because of the size, I had no flat space where I could take a photo.  I propped up a 4' x 6' pin board on top of a table.  Problem is that is leans a bit backwards plus there is a break when the quilt goes over the edge of the dining room table.  Hope you can look past that to see the beauty of the prayers.

The open circle* in the center of the quilt has some thoughts at the end of the prayer blocks.  For me, it was the hardest things to sew.  If you have ever tried to sew or draw a perfect circle, you will understand my challenge.  It was required by the quilt.

Original Finished Prayer Block
Each of the following blocks were created on a 6.5" square.  Some did not grasp the fact that when sewn, it would shrink the edges.  I think they are all lovely prayers from the heart.  They are also, in my opinion, loving works of art.  A clue to their placement on the quilt is the hearts.


Interpreted Art Work
These are pieces of original art that could not be copied because my lack of skill in copying the original drawing which could not be used because of 'bleeding sharpies'.  

For more information see, 
https://designerann.blogspot.com/2017/11/the-problem-with-sharpie.html


Requested Prayer Blocks
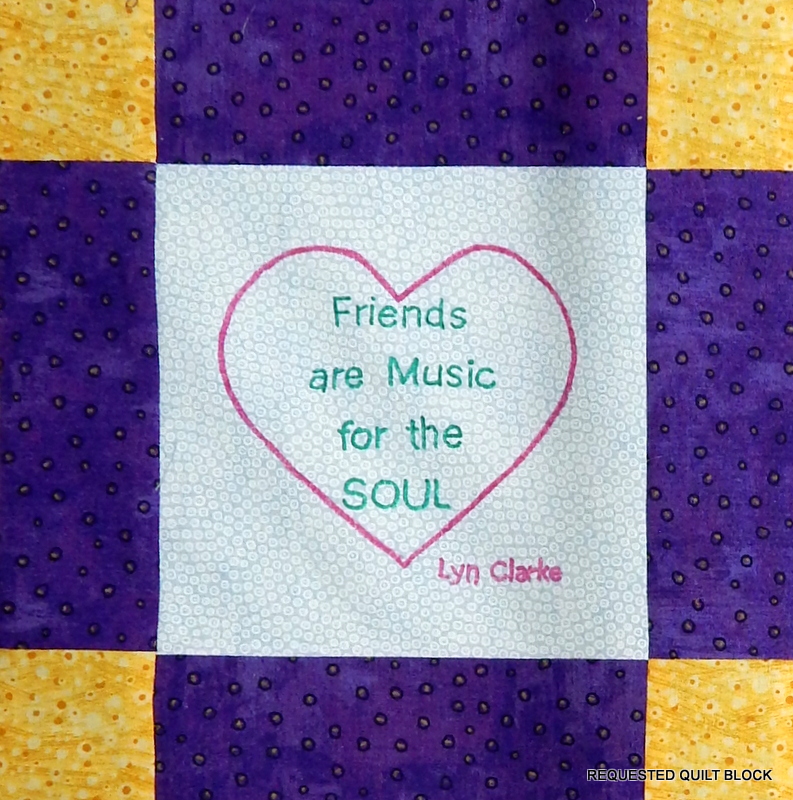
These are blocks that people from away, busy people, and some who were not sure enough to draw their own block.  Some mailed, some emailed and some asked me in person [I had them write on a piece of paper exactly what they wanted plus how they wanted it displayed, ie with or without a drawing or symbol].  Then I put those thoughts on a block for them.  I am sure their prayers go far beyond my lettering.  I just did my best to interpret their prayers.


Traced Blocks

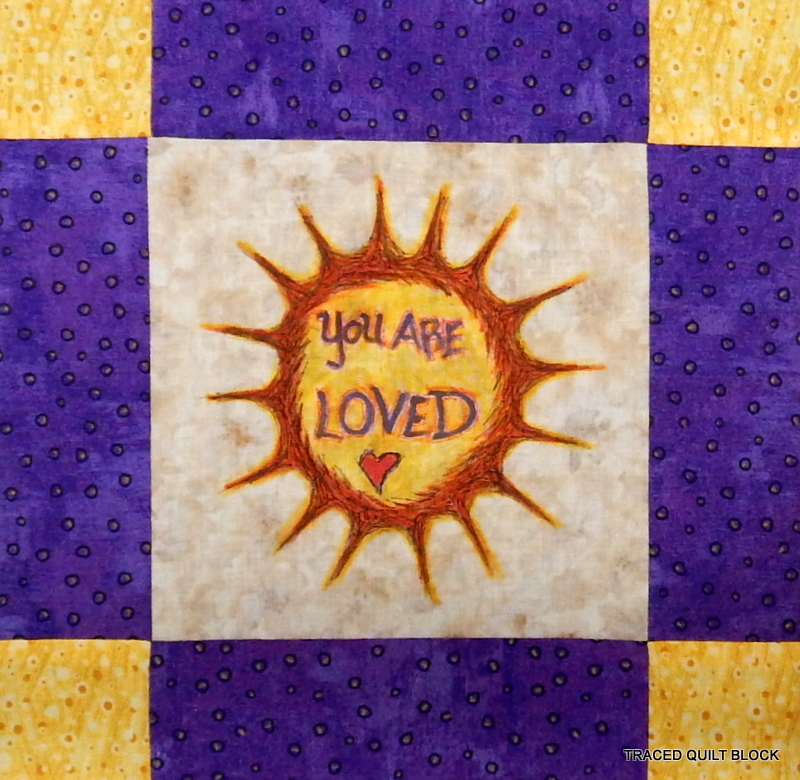
These are blocks that were previously made my someone using a sharpie that I provided or in one case, mailing in a completed block using what was thought to be permanent marker.   At that time, I thought sharpies were permanent on fabric.  No, they are not.  I am sure that in ALL cases, the originals were better than my copies.  
I did what I could to recreate them using permanent fabric markers.


Regardless of the final block, I know in my heart that they all were made with LOVE plus they all contain prayers of nourishment and energy.

LOTS of LOVE in this quilt.

Still more LOVE in a Book of Prayers.


The style of the cover heart block dictated the style of the book.


*About the Circle in the center of the quilt.
A circle is a universal symbol meaning sacred and divine.  
A circle represents the infinite energy of the universe.
A circle represent everlasting love.
A circle represents LIFE:  birth, survival, death.  Then the death gives new life.
A circle represents the unbroken live which has no beginning and no end.  
A circle is complete within itself.

Please also read 
http://www.aseekersthoughts.com/2010/01/circle-as-symbol.html